This is kind of a follow up to the UI Manager post. I will add a couple of functions to the UIManager script but overall, the pop-up window can be used separately. Before we begin, keep in mind that it will be a slightly more advanced tutorial and I will assume that you know about the Unity Actions and Queue. Oh and this is a long one!
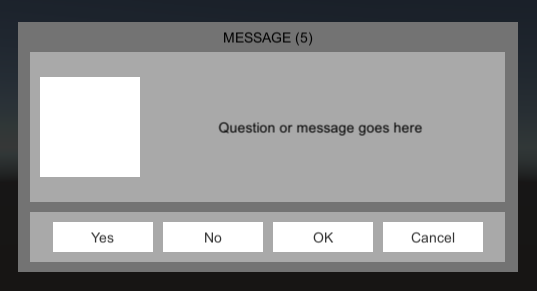
You know those windows that pop up in the middle of a game and asks you to buy a pack of gems at a low low price of 49.99$? Yep, we will do one of those. It will be a generic window, just like this:
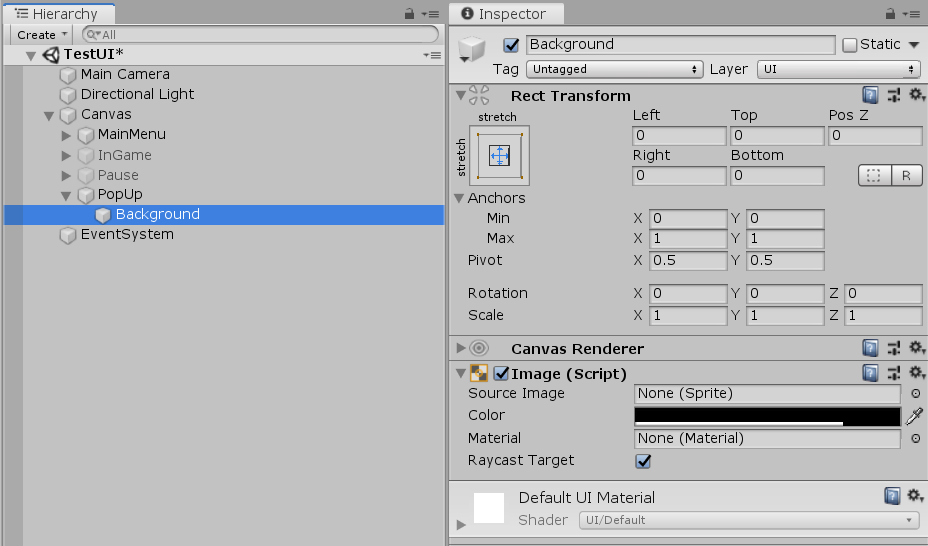
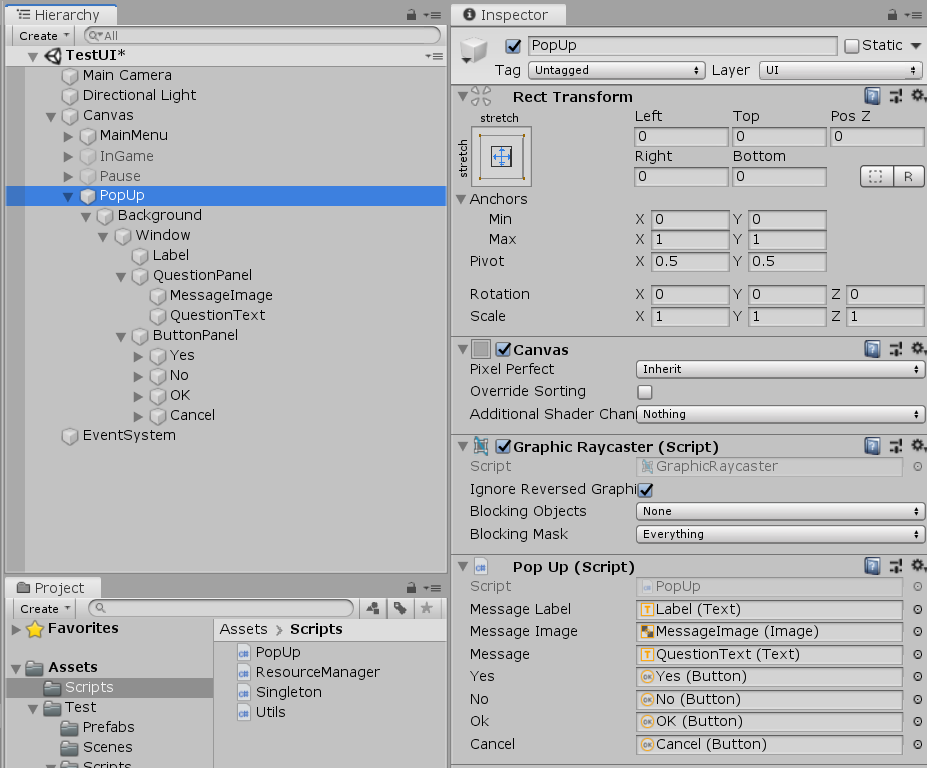
So first things first, let’s set up the hierarchy. Create a new canvas and call it PopUp. Under the PopUp canvas add a panel, call it Background, make sure it stretched in both directions and remove the default background image (I hate it). Also, you might want to change its color so the game becomes darker whenever this window pops up.
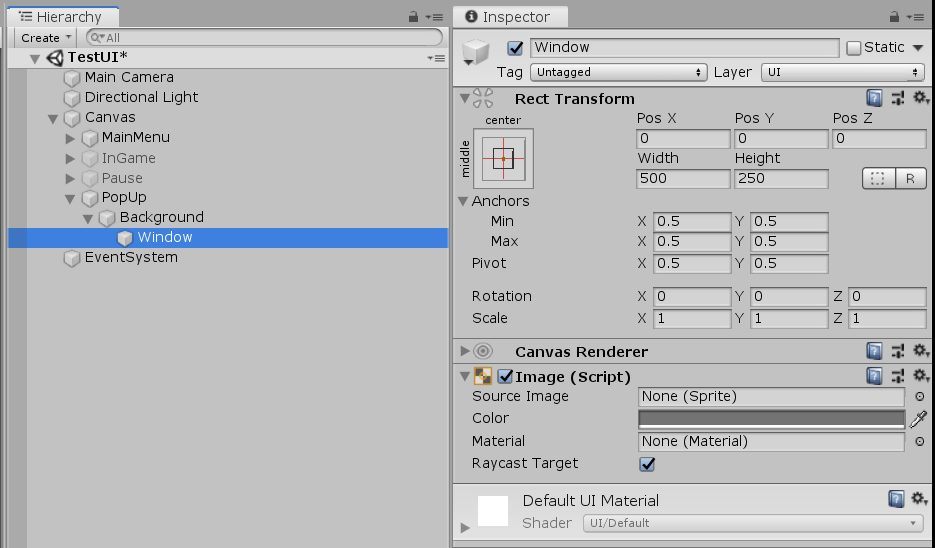
Now we need the window itself. Create a new panel under the Background panel, rename it to Window, set anchors to center, set width and height to 500 and 250 respectively, remove the default background image and set the alpha value of the color to 255 and the color itself to grey.
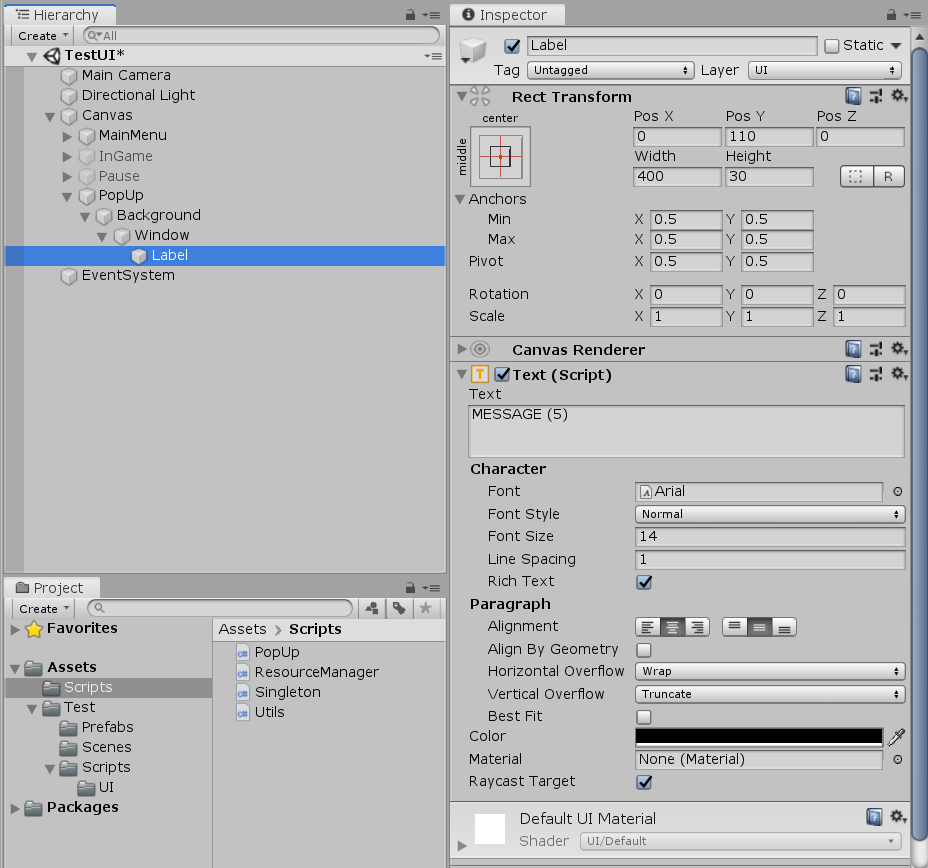
To the Window panel add a text, call it “Label” and move it to the top. Set the alignment to the center and write something like “Messages (5)”. This label will indicate the count of messages. Also, it might indicate the type of the message like error, warning or log. But we won’t do it here.
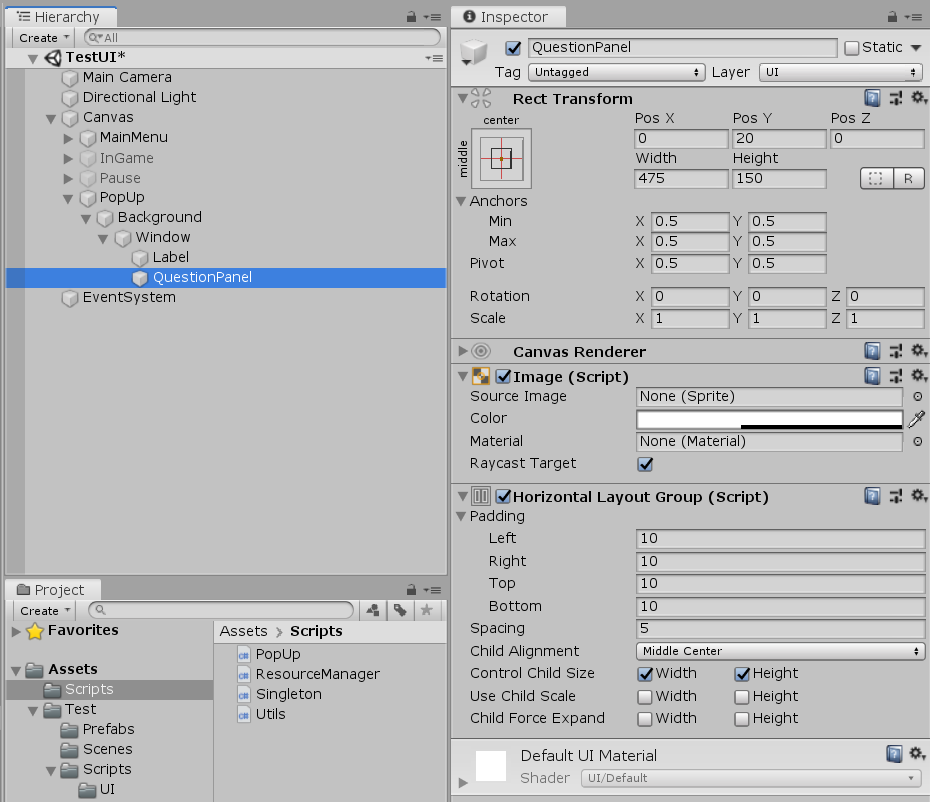
Add a panel under the Window panel and call it QuestionPanel. We will have our question over here. Remove the default background image, set the anchors to center, resize and reposition it like it is shown in the screenshot below. Add a Horizontal Layout Group, we will need it because we will have an optional image next to the message text. Set the child alignment to the middle center and control child size to true for both width and height.
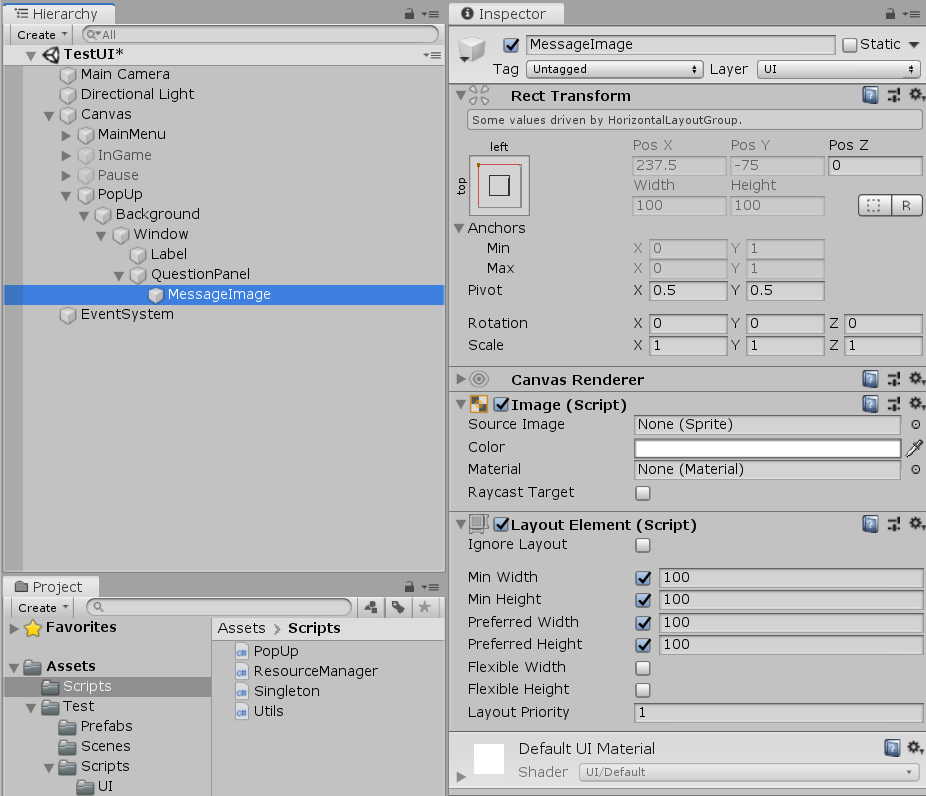
Under the QuestionPanel, add an image and call it MessageImage. Add a Layout Element as a component min width, min height, preferred width and preferred height to 100. It should be enough.
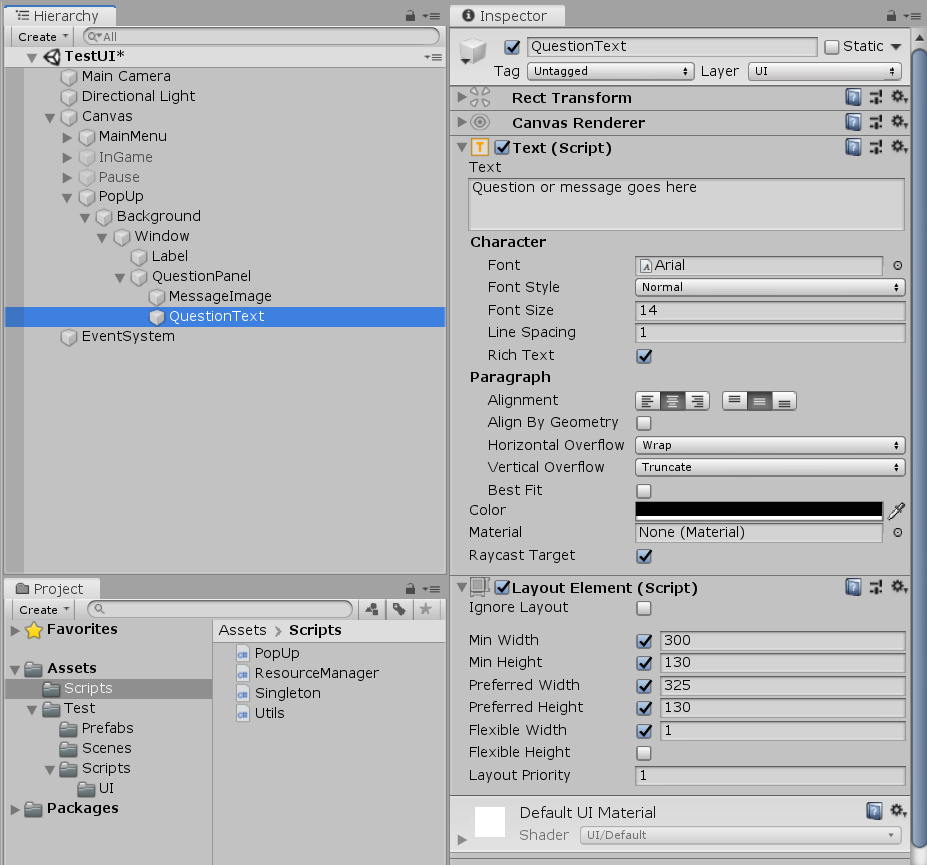
Add a text under the QuestionPanel and rename it to QuestionText. Set the alignment of the text to the center and add a Layout Element. Set the min width to 300, min height to 130, preferred width to 325, preferred height to 130 and flexible width to 1.
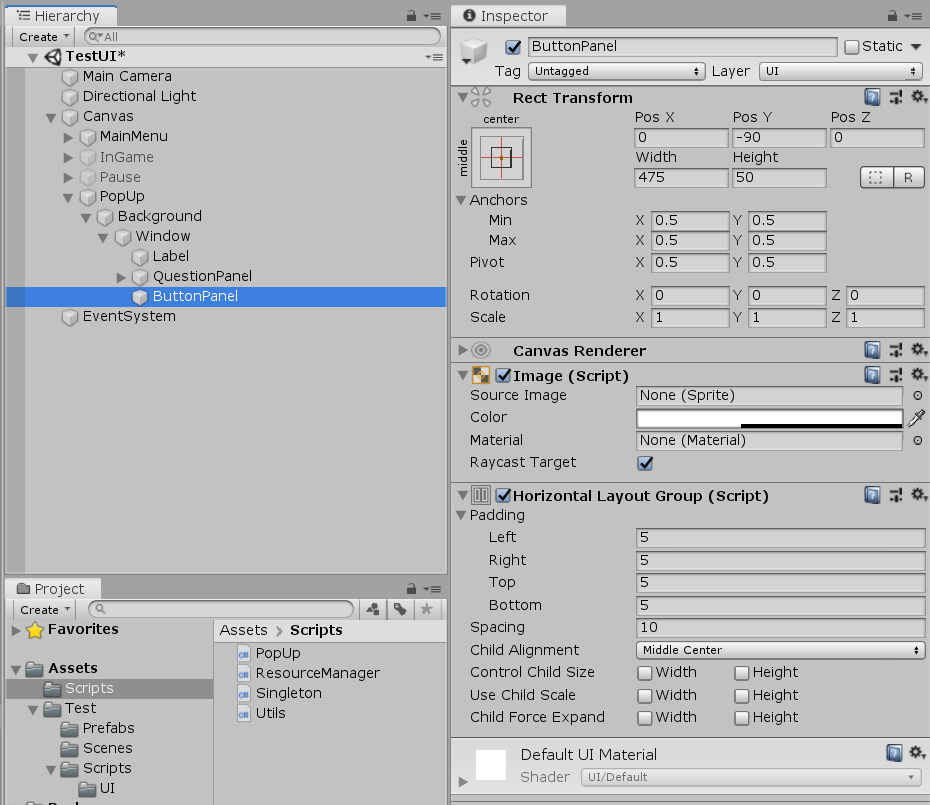
Next, create another panel under the Window panel and call it ButtonPanel. Set the alignment of the transform component to the center, resize and reposition it below the QuestionPanel. Remove the default background image and add a Horizontal Layout Group component. Uncheck all of the size and scale options and set the child alignment to middle center.
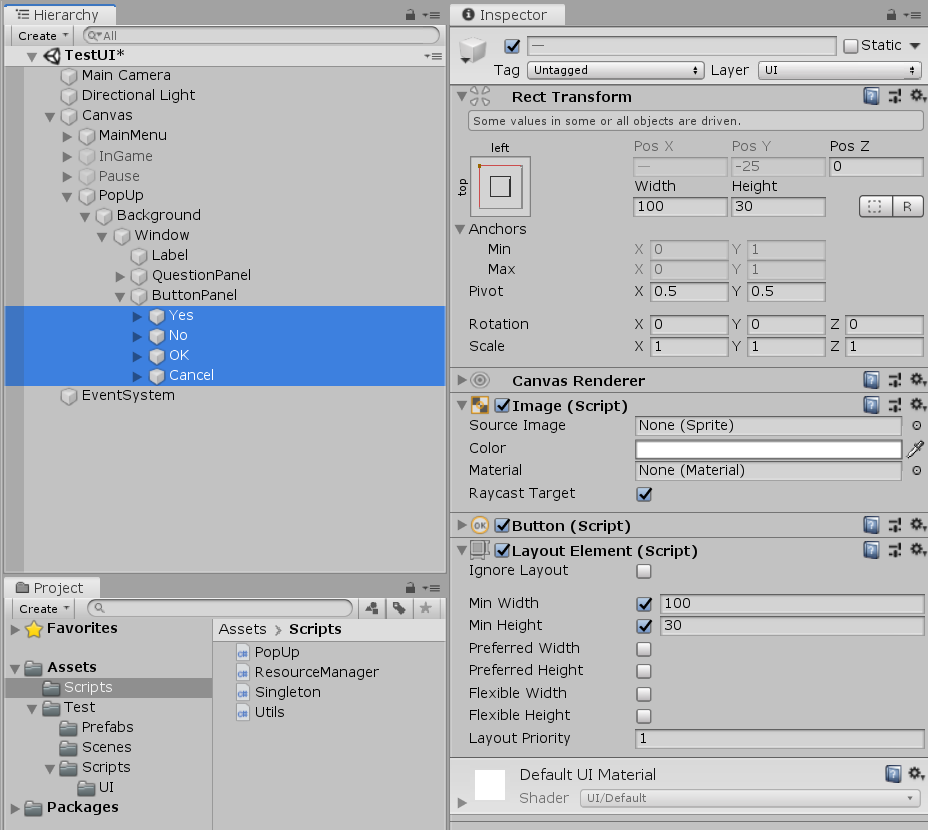
Create a new button under the ButtonPanel, rename it to Yes and add a Layout Element component. Set the width and min with to 100, height and min height to 30. Write Yes as a text. Duplicate the button three times (CTRL+D). Rename new buttons to “No”, “OK” and “Cancel”. Don’t forget to change their texts as well.
And we are done with the hierarchy! You should have a window similar to the one at the beginning of this post. Now let’s move on to the fun part: scripting!
First, create a new script and call it PopUp. Define two text fields; messageLabel and message, four buttons; yes, no, ok and cancel and an image; messageImage.
using UnityEngine;
using UnityEngine.UI;

public class PopUp : MonoBehaviour
{
    [SerializeField] private Text messageLabel;
    [SerializeField] private Image messageImage;
    [SerializeField] private Text message;
    [SerializeField] private Button yes;
    [SerializeField] private Button no;
    [SerializeField] private Button ok;
    [SerializeField] private Button cancel;
}
Add this script to the PopUp canvas in the hierarchy and set the variables.
Just to make our lives easier, let’s write a class and call it Message. You can either create a new script for it or add it to the PopUp script. Then we will make use of the Queue<T> to hold the registered messages.
using System;
using System.Collections.Generic;
using UnityEngine;
using UnityEngine.UI;

public class Message
{
    public Sprite img;
    public string message;
    public UnityAction yes;
    public UnityAction no;
    public UnityAction ok;
    public UnityAction cancel;

    public Message() { }
    public Message(string msg, UnityAction _ok, UnityAction _yes, UnityAction _no, UnityAction _cancel, Sprite _img)
    {
        message = msg;
        ok = _ok;
        yes = _yes;
        no = _no;
        cancel = _cancel;
        img = _img;
    }
}

public class PopUp : MonoBehaviour
{
    [SerializeField] private Text messageLabel;
    [SerializeField] private Image messageImage;
    [SerializeField] private Text message;
    [SerializeField] private Button yes;
    [SerializeField] private Button no;
    [SerializeField] private Button ok;
    [SerializeField] private Button cancel;

    private Queue<Message> messages = new Queue<Message>();
}
In the Message class, we have an image to set as the message image, the message itself and an action for each button. Also for the convenience, I’ve added a constructor for this class. Next let’s write a function that will check if we have any messages in the queue, dequeue one of them and update the message label if we do and disable the pop-up window if we don’t.
private void CheckMessages()
{
    if (messages.Count > 0)
    {
        //Set message label text
        messageLabel.text = string.Format("Got {0} message{1}", (messages.Count + 1).ToString(), messages.Count == 0 ? string.Empty : "s");
        SetMessage(messages.Dequeue());
    }
    else
        gameObject.SetActive(false);
}
Now let’s write a function to set the message. The function will be called SetMessage and will get an argument of type Message. The first thing it is gonna do is to check if we have an image in this message and set it if we do. It will disable the question image otherwise. Then it will set the message text.
private void SetMessage(Message msg)
{
    //Set image if needed. Disable the image object otherwise
    if (msg.img)
    {
        messageImage.gameObject.SetActive(true);
        messageImage.sprite = msg.img;
    }
    else
    {
        messageImage.gameObject.SetActive(false);
    }

    //Set the message text
    message.text = msg.message;
}
Before we set up the buttons we need to remove all listeners from them.
//Remove listeners from the buttons
yes.onClick.RemoveAllListeners();
no.onClick.RemoveAllListeners();
ok.onClick.RemoveAllListeners();
cancel.onClick.RemoveAllListeners();
We will activate the Yes button only if we have “Yes Callback”, the “Yes” Action in our case. If we do, we want to register it and enable the button and disable it if we don’t. Also, we want to check if we have any messages left after we click on the button.
if (msg.yes != null)
{
    yes.gameObject.SetActive(true);
    yes.onClick.AddListener(msg.yes);
    yes.onClick.AddListener(CheckMessages);
}
else
{
    yes.gameObject.SetActive(false);
}
Do exactly the same thing for no and cancel buttons. The OK button will be slightly different. We want to enable it if we either have a callback for OK or if none of the other buttons were set.
//If other buttons are disabled, we probably want the OK button to be enabled
if (!cancel.gameObject.activeSelf && !no.gameObject.activeSelf && !yes.gameObject.activeSelf)
{
    ok.gameObject.SetActive(true);
    ok.onClick.AddListener(CheckMessages);
    if (msg.ok != null)
        ok.onClick.AddListener(msg.ok);
}
else if (msg.ok != null)
{
    ok.gameObject.SetActive(true);
    ok.onClick.AddListener(msg.ok);
    ok.onClick.AddListener(CheckMessages);
}
else
{
    ok.gameObject.SetActive(false);
}
Finally, we need a function to actually register the new messages. In fact, we will have two of them. One will get a Message as an argument and the other will get only the variables of the Message, construct an instance of the class and pass it as an argument to the first function.
public void Register(string msg, UnityAction okAction = null, UnityAction yesAction = null, UnityAction noAction = null, UnityAction cancelAction = null, Sprite img = null)
{
    Register(new Message(msg, okAction, yesAction, noAction, cancelAction, img));
}

public void Register(Message msg)
{
    messages.Enqueue(msg);
    if (!gameObject.activeSelf)
    {
        gameObject.SetActive(true);
        CheckMessages();
    }
}
And we are done! Now, whenever we want the window to pop up all we have to do is to call a Register() function with appropriate arguments. Notice that most of them are optional. Only the message itself is mandatory (for obvious reasons).
For the sake of consistency, I’ve added a PopUp variable to the UIManager and a function to register a message. You can find the example in the Assets/Test/Scenes/TestUI scene of the ExtraTools project.
public void PopUpMessage(string msg, UnityAction ok = null, UnityAction yes = null, UnityAction no = null, UnityAction cancel = null, Sprite img = null)
{
    popUp.Register(msg, ok, yes, no, cancel, img);
}
Keep in mind though, passing an argument to functions like this creates copies of them in memory. While an integer here a float there won’t be a problem, strings and images can cause issues. So make sure you don’t call such functions too frequently or consider passing arguments by reference.
Check out the PopUp script on the Github. Also, check the rest of the ExtraTools project on Github. Let me know if you have any suggestions for the PopUp window, the rest of the ExtraTools project, or for a future blog post.
Does the “SetMessage” function perform any other tasks apart from handling images and message text?