
I assume you have read the first part of this tutorial, and you know the basics. In this part, we will address some practical issues with that approach.
Actually, I described the main reason why it is hard to work: you have to handle and covert all of your data to string before saving manually. Then you have to reverse that process when loading. It is very easy to miss a variable or two, and it is a time-consuming and tedious process in general. Wouldn’t it be nice if we had a single data class that would be easy to save and load? Well yes, of course, it would! So let’s have it! Create a new script and call it PlayerData.cs. Here is what its gonna look like:
public class PlayerData
{
	public string playerName;
	public float playerHealth;
}
Simple enough. Now let’s create a new Player class that will use this data (or modify the one from Part 1, if you followed it)
using UnityEngine;

public class Player : MonoBehaviour
{
	public PlayerData playerData;

	private void Start()
	{
		// Load the data when the game starts
		LoadData();
	}

	private void OnDisable()
	{
		// Save the data when the game stops
		SaveData();
	}

	private void SaveData()
	{
		// Save the data
	}

	private void LoadData()
	{
		// Load the data
	}
}
That’s nice. But if you add this script to a scene you won’t be able to see the playerData in the inspector. Don’t worry, there is an easy way to fix it. Just add [System.Serializable] attribute before the class definition of the PlayerData, like so:
[System.Serializable]
public class PlayerData
{
	public string playerName;
	public float playerHealth;
}
Now you should be able to see the class and its fields in the inspector.
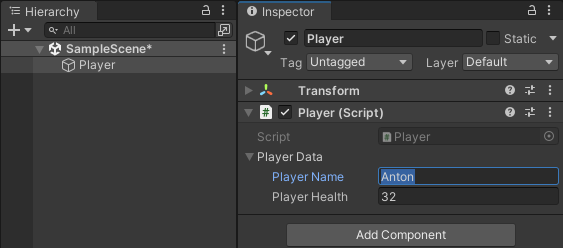
At this point, you can use the system from the first part. All you have to do is to replace playerName with playerData.playerName, and playerHealth with playerData.playerHealth. However, it won’t solve our problem just yet. To be able to save the PlayerData class, we will need to learn one more thing: JavaScript Object Notation.
JSON
Don’t be afraid! JavaScript Object Notation or JSON for short is not another language. It is a simple format used to store and transmit data. It can be read and edited with any text editor. Here is how it looks:
{
  "playerName": "Anton",
  "playerHealth": 32.0,
  "levelNumber": 3,
  "hasWeapon": false,
  "inventory": [ "item1", "item2", "item3" ]
}
The curly brackets at the beginning and the end of the file are mandatory. The rest is our data. As you can see it is stored in valueName : value format, and it knows about strings, integers, floats, booleans, and arrays. It also can store other objects in form of sub-jsons, but we will talk about them later.
How about XML or YAML?
There are other notations, conventions, and languages that can be used instead of JSON. Extensible Markup Language or XML, and YAML or Yet Another Markup Language (or YAML Ain’t Markup Language) are two such examples. And they can be used to store data. However, JSON has a nice integration with Unity and is a lightweight notation. So I prefer to use JSON if I have a choice.
Saving and loading
Here comes the cool part: to convert the data to a string, all you have to do is to use a single method:
private void SaveData()
{
	string savePath = $"{Application.persistentDataPath}/Save.json";
	string data = JsonUtility.ToJson(playerData);
	System.IO.File.WriteAllText(savePath, data);
}
As you can see, the JsonUtility.ToJson() did all the work for us. We don’t have to build strings manually anymore. But what about loading? Let’s see…
private void LoadData()
{
	string savePath = $"{Application.persistentDataPath}/Save.json";
	// Read the json file
	string data = System.IO.File.ReadAllText(savePath);
	// Convert the json text to PlayerData
	playerData = JsonUtility.FromJson<PlayerData>(data);
}
That is all! If you need to add another variable to the player data, just add it to class. You don’t have to do anything else. And if you want to modify the JSON file without launching the Unity editor or the game, you can do it with a simple text editor, like Notepad.
Tips and tricks, and caveats
Formatting issues
If you use the code above as-is, you will notice that your JSON file looks ugly. Like this:
{"playerName":"Anton","playerHealth":32.0}All of the data is on the same line. The reason for this is simple: the new line is just another character (usually represented like \n). Adding extra characters to a file makes it bigger. Sure, it won’t affect the performance of a game. But keep in mind that JSON is also used in online applications. Why send useless information over the network when the speed is very important? So by default new line is ignored.
If you have an editor which supports JSON, it is easy to re-format the file whenever you want to read it. But it is also possible to write it with new lines. All you have to do is pass another argument to the ToJson() method:
string data = JsonUtility.ToJson(playerData, true);
That second argument is false by default. If you change it to true, it will give you a nicely formatted JSON file.
Saving objects
Above, I mentioned that you can save other objects as well. By other objects, I mean stuff like other classes. For example, let’s assume we have a companion in our game. Here is the class which would represent them:
[System.Serializable]
public class Companion
{
	public string name;
	public int age;
}
Let’s add it to the player data.
[System.Serializable]
public class PlayerData
{
	public string playerName;
	public float playerHealth;
	public Companion companion;
}
Now let’s start the game, modify the companion and stop it. Here is how it looks in the editor:
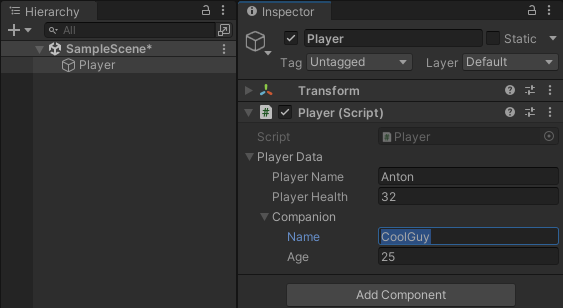
And this is the new JSON:
{
    "playerName": "Anton",
    "playerHealth": 32.0,
    "companion":
    {
        "name": "CoolGuy",
        "age": 25
    }
}
As you can see, the companion is added almost like another JSON. This is what I meant by “sub-JSON.”
No cyclic references!
Let’s assume our companion holds data for another player:
[System.Serializable]
public class Companion
{
	public string name;
	public int age;
	public PlayerData anotherPlayerData;
}
This is a problem. PlayerData can hold Companion, and Companion can hold PlayerData, and so on. As you can see we have an infinitely deep reference tree. Even Unity doesn’t like it, you will get the following warning if you run this code:
Serialization depth limit 10 exceeded at 'Companion.anotherPlayerData'. There may be an object composition cycle in one or more of your serialized classes.
And, of course, PlayerData won’t be in the JSON file. There are ways around it, but try to avoid such use cases whenever possible. If you really need such a class you may want to use Newtonsoft’s Json for Unity. it’s a more advanced alternative to Unity’s JsonUtility.
Saving private fields
So far I only used public variables. But in a real-world scenario you may not want to do so. If that’s the case you can use Unity’s [SerializeField] attribute.
[System.Serializable]
public class PlayerData
{
	public string playerName;
	public float playerHealth;
	[SerializeField] private int _moneyInTheBank;
	public Companion companion;
}
Speaking of serialization, the [System.Serializable] attribute serves a similar purpose to the [SerializeField]. The class PlayerData won’t be converted to the string or viewed in the inspector without it.
And this is all you need to know to start using JSON to save your data! Let me know if you have any questions about this topic or Unity in general. Perhaps I can write a few more beginner-friendly tutorials!
One thought to “Save System (Part 2)”
Comments are closed.